Build a Digital Booklet Gift Maker With One Prompt, Then Gift It Free or Sell It With Razorpay
Build a booklet gift maker with one Claude Code prompt. Export it as one HTML file to gift, or sell it with Google sign-in and Razorpay.
In this guide
- What you're building
- Why people pay for this
- Before you start
- Step 1: Paste the prompt
- What the prompt tells Claude
- Step 2: Run it and check it
- Step 3: The gift path
- Step 4: What you are selling
- Step 5: Turn it into a product site
- Step 6: Google sign-in with Supabase
- Step 7: Payments with Razorpay
- Step 8: Gate the download
- Step 9: Go live on Vercel
- Step 10: Price it and deliver it
- The Instagram page
- DM scripts
- Skills and resume
- FAQ
AI Side Hustles · Build and Gift · Build and Sell
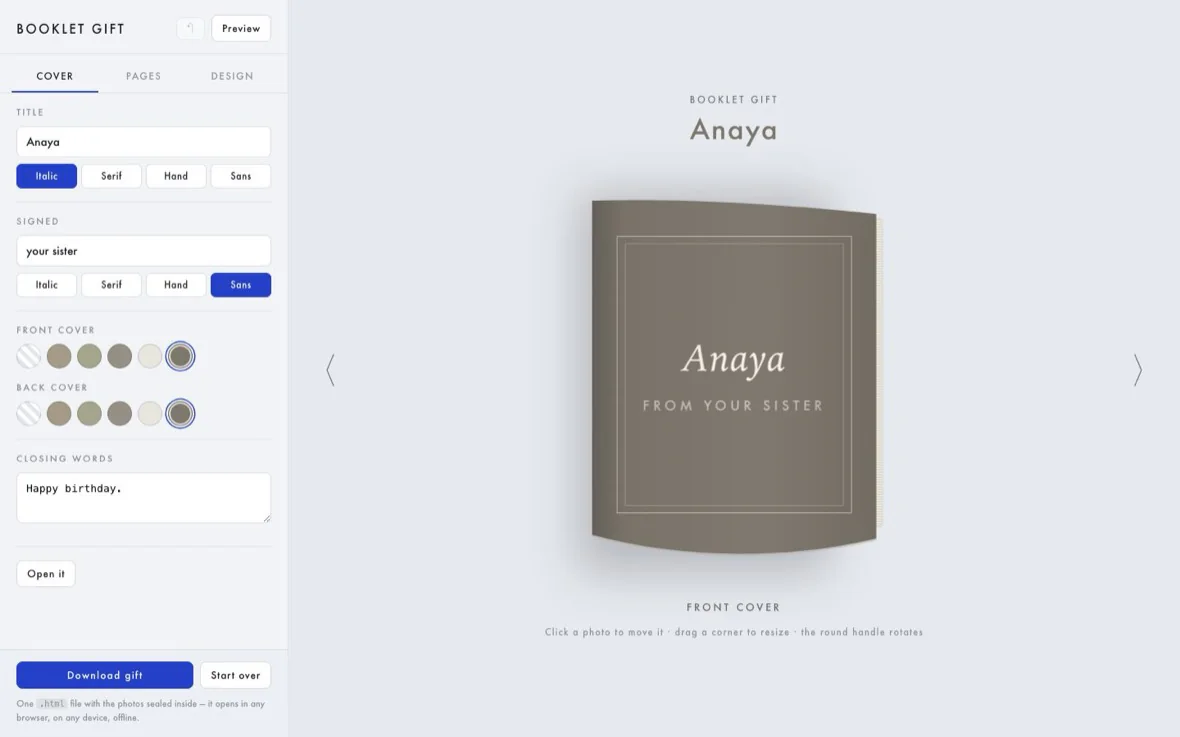
A booklet gift maker is a page with an editor on one side and a real book on the other — a book that sits shut until you click it, then opens and turns its pages. You build it with one Claude Code prompt, fill it with someone's photos and your own words, and export the whole thing as a single HTML file you can send them. Give it away as a gift, or put the editor behind Google sign-in and Razorpay and charge ₹199 to ₹499 for the download.
What you're building
A page with an editor on the left and a book on the right. The book starts shut — one cloth board facing you, with the page block visible at its fore-edge. Click it and the case opens: the far board swings out on its hinge and the first spread appears. Click a page and it turns, the leaf lifting and folding over the gutter the way paper does.

You fill it from the editor: up to 15 photos, seven or so spreads, a note in your own words, a title on the cover, and a colour for every surface. Then you press Download gift and get one .html file with the photos sealed inside.

That file is the product. Whoever you send it to double-clicks it, the book fills their screen, and it works offline, forever, with no app and no account.

Gift it. Make a booklet for your sister's birthday, download the file, AirDrop it. Costs nothing, needs no deployment, finished in an evening.
Sell it. Put the editor online behind Google sign-in, charge for the download, and let strangers make their own. Same code, one gate added.
Why people pay for this
A birthday post disappears in a day. A printed photo book takes ten days and ₹1,500. This sits in between: it costs nothing to make, it arrives instantly, and it feels handmade because it is — the words are yours.
- It's an occasion product. Birthdays, anniversaries, farewells, Raksha Bandhan, wedding thank-yous. There is always another one coming.
- The buyer already has the photos. They're on their phone. The hard part was never the pictures — it was making them feel like a gift.
- It's cheap enough to be an impulse. ₹199 for something that takes fifteen minutes and makes someone cry is an easy yes.
- It delivers itself. No printing, no courier, no address. The file is the delivery.
₹299 × 500 buyers = ₹1,49,500. The build costs nothing to copy, so almost every sale after the first is margin.
That's revenue, not a promise. Nobody sells 500 of anything without showing up consistently. Aim for your first ten paid booklets, collect what people say about them, and grow from there. Most early sales will be "done for you", not self-serve — that's normal, and it pays better.
Before you start
You need Claude Code, Node.js and a browser. Make the Vercel, Supabase and Razorpay accounts later, at the step that needs them.
macOS Mac
- Install Claude Code in Terminal:
curl -fsSL https://claude.ai/install.sh | bash
- Install Node.js LTS from nodejs.org.
Windows PC
- Install Claude Code in PowerShell:
irm https://claude.ai/install.ps1 | iex
- Install Node.js LTS from nodejs.org.
Nothing else is needed for the free version — the booklet maker is plain HTML, CSS and JavaScript, with no build step and no backend.
Step 1: Create the folder and paste the prompt
Make a folder, open Claude Code inside it, and paste the prompt below whole. Everything it builds stays in that folder.
macOS Terminal
cd ~/Desktop/booklet-gift
claude
Windows PowerShell
cd $HOME\Desktop\booklet-gift
claude
Build me a "booklet gift maker": a web page with an editor on the left and a live book on
the right, where I compose a small photo booklet and export it as ONE self-contained .html
file I can send to someone as a gift.

Work only inside the current folder. Plain HTML, CSS and JavaScript — no framework, no build
step, no backend, no npm install. Serve it over a local static server, never file://.

PART 1 — THE BOOK AND THE PAGE TURN
- A spread is one element with the aspect ratio 1280x720, drawn as an open book: cream paper
  with curved outer edges, a darker gutter down the middle, and a soft shadow underneath.
  Clip the paper with an SVG clipPath using clipPathUnits="objectBoundingBox" so it scales.
- Turning a page must look like paper, not a slide. Build it this way:
  * .sb-flap is a 50%-wide leaf holding two faces with backface-visibility:hidden — the old
    page on the front, the new page on the back — rotating rotateY(±180deg) over 0.85s with
    the container at perspective:2600px, transform-origin on the gutter.
  * Underneath it, the half that is NOT turning keeps showing the old page and fades out at
    70% of the turn, so the swap happens exactly as the leaf lands.
  * The half the leaf uncovers fades in beneath it.
  * Each half is a 50%-wide window with overflow:clip holding a 200%-wide copy of a spread,
    offset by margin-left:-100% for the right half. That way either half of any page is
    addressable without slicing images.
- All page content is positioned in PERCENTAGES of the spread, and every decorative size is
  in cqw, so a page looks identical at any width — including on the turning leaf. Put
  container-type:inline-size on the spread and font-size:1cqw on its CHILDREN, never on the
  spread itself (container units used on the container resolve against the viewport).

PART 2 — COVERS, AND THE BOOK BEING SHUT
- The first page is a front cover and the last is a back cover: cloth boards, not paper, with
  the title on the front board, "from <name>" under it, and a blind-stamped ring on the other
  board. The back cover mirrors the front and carries a closing line.
- The book must START CLOSED, everywhere — on first load, in preview, and in the exported
  file. Only the front board faces the reader, centred, with the page block visible at the
  fore-edge. Clicking it opens the case: the far board swings out on its hinge while the book
  widens into a spread. Clicking the near board shuts it again.
- Paint covers as two hinged halves (transform-origin on the gutter, backface-visibility
  hidden so the folded board disappears behind the other). Interior pages stay a single
  element — splitting them would duplicate every item.

PART 3 — THE EDITOR
Left panel, in three tabs so every control sits next to the thing it changes:
- COVER: title + its typeface, "signed by" + its typeface, front cover colour, back cover
  colour, closing words, and a "show it closed" toggle.
- PAGES: photo tray, page strip, arrangement presets, left-page and right-page colour, and
  buttons to add a note or delete the page.
- DESIGN: palette, paper colour, cloth colour, a YouTube link for music, and a device preview.
Rules:
- Up to 15 photos. Downscale each to 1500px and re-encode as JPEG on import, or the gift file
  becomes too big to email.
- Photos can be dragged from the tray onto the page and land where dropped, or clicked to be
  placed by the current arrangement. Image files dropped straight onto the book work too.
- On the page: drag to move, a round handle above to rotate, a corner to resize, a red × to
  delete. Single click selects a note and moves it; double-click types in it.
- A photo's starting width must be derived from its OWN aspect ratio so a tall portrait and a
  wide landscape arrive at the same visual weight (width is a % of the spread's WIDTH while
  height follows the image, so a portrait at the same width lands nearly twice as tall).
- Notes: per-item typeface (italic serif / serif / sans / hand), size, alignment, ink colour
  and rotation. A note's clickable area must hug its words, not fill its slot, or it will
  swallow clicks meant for the photo underneath.
- Eight arrangement presets (full bleed, one each side, note + photo, four up, three across,
  stack + note, scattered polaroids, title page). Applying one tidies the page around whatever
  is already on it; moving anything by hand stops the page auto-arranging.
- Colour: a palette of four-colour themes, plus the SAME colour control on every surface —
  paper, cloth, front cover, back cover, left page, right page — each offering the palette's
  colours, an inherit chip, and a free colour picker. Ink flips between dark and light based
  on the background's WCAG relative luminance, so text stays readable on any colour.
- Undo (⌘Z), autosave, and keyboard arrows to turn pages.
- Storage: the document (text, positions, colours) in localStorage; the photos as blobs in
  IndexedDB. Closing the tab must not lose the booklet.

PART 4 — PREVIEW, MUSIC AND PHONES
- A Preview mode that hides the editor completely: no selection outlines, no handles, no
  captions, no hints — the booklet and nothing else, full-bleed, with the screen behind it
  taking the colour of whatever page is open. An "← Edit" pill and Esc bring the editor back.
- Music: paste a YouTube link and a small round play button appears in the bottom-right corner
  of preview and of the exported file. Load NOTHING until it is pressed — browsers block
  autoplay with sound, so the player must be created inside the click, using the YouTube
  IFrame Player API (postMessage on a bare iframe will not unmute reliably). Pressing it again
  pauses. Fall back to a plain autoplaying embed if the API is blocked.
- Device preview (desktop / tablet / phone) lives in the preview bar only, and leaving preview
  resets it to desktop. Make the device box a CSS container so the booklet's own responsive
  rules react to the simulated width, not the window.
- On a portrait phone, show a message over the still-visible booklet: "Please rotate your
  mobile to view it more nicely and make for a better view." It clears itself when the phone
  is turned.

PART 5 — THE GIFT FILE
- A "Download gift" button that writes ONE .html file containing: the layout as JSON, every
  photo used, base64-encoded as a data: URL, and the turn engine and stylesheet inlined. No
  external requests except the optional music.
- Ask where to save with showSaveFilePicker when the browser has it, and fall back to an
  anchor that is APPENDED TO THE DOCUMENT before clicking (a detached anchor is silently
  blocked). Never report "Saved" unless it actually saved — say what really happened.
- The exported file opens shut, on a full screen, with no chrome at all, and the first click
  both opens the book and requests fullscreen so the browser's tabs and address bar drop away.
- Structure the code so the reader needs only three files inlined — the stylesheet, the page
  renderer and the turn engine. Editor-only code must live in separate files that are never
  exported.

PART 6 — RUN IT AND PROVE IT WORKS
1. Start a static server and give me the localhost link.
2. Add three photos yourself, build a two-page booklet, and show me a screenshot of a spread
   and of the book shut.
3. Export a gift file, open it from file://, and confirm every page turns and every photo
   renders with no console errors. Tell me the file size.
Do not tell me it works. Show me.
What each part of the prompt is doing
| Part | What it tells Claude | Why it matters |
|---|---|---|
| 1 · The turn | The leaf, the two hinged halves, percentages and cqw | This is the whole illusion. Get it wrong and you have a slideshow |
| 2 · Covers | Start shut, open on click, covers as hinged halves | A booklet you open feels like a gift. One that starts open is a web page |
| 3 · The editor | Three tabs, drag, rotate, resize, colour on every surface | The part your buyer actually touches |
| 4 · Preview | Hide every editor affordance; the phone rotate message | What the recipient sees must have none of your tooling in it |
| 5 · The gift file | One HTML, photos as data URLs, fullscreen on open | This is the product. Everything else is the factory |
| 6 · Prove it | Build a booklet, export it, open it, report the size | Claude must demonstrate it, not claim it |
Every fussy line in there — append the anchor to the document, container units on the children, create the player inside the click — is a bug someone already hit and fixed. Vague prompts produce a demo; specific prompts produce something you can sell. Keep them in.
Step 2: Run it and check it on localhost
Claude Code gives you a link like http://localhost:4477. Localhost means it runs only on your computer.
- Drop in photosDrag five or six from your phone folder onto the panel.
- Build a pageDrag a photo onto the page, add a note, pick an arrangement.
- Shut the bookPress Show it closed, then click to open it. If that doesn't feel like opening a book, say so and have Claude Code tune the timing before you go further.
- ExportPress Download gift and open the file. That is exactly what your buyer receives.

Send the exported file to one friend on WhatsApp and watch them open it without instructions. If they don't know to click the book, add the hint line. Everything else is decoration.
Step 3: The gift path — free, no deployment
If you only want to make gifts, you're finished. There is nothing to deploy. Build it, press Download gift, and send the file over WhatsApp as a document, by email, or on AirDrop. They double-click; it opens shut; they click; the book opens.

| Typical size | 200KB–5MB, depending on how many photos |
| Works offline | Yes, forever. Nothing is fetched except optional music |
| Needs an account | No — neither yours nor theirs |
| Expires | Never. No link to rot, no hosting bill |
WhatsApp won't preview an .html file — it sends as a document, which is fine. If the file is over 5MB, drop two photos or tell Claude Code to downscale to 1200px instead of 1500px.
Step 4: Decide what you're actually selling
Three models. Most people should start with the first, because it needs no code at all and pays the most per hour.
| Model | What the buyer gets | What you need | Price to test |
|---|---|---|---|
| Done for you | You make the booklet from photos they send, and hand back the file | Nothing. Your laptop and a payment link | ₹799–₹2,500 |
| The template | The folder, so they run the editor themselves | A zip on Gumroad or Topmate | ₹299–₹599 |
| SaaS | An account on your site where they make their own and pay to download | Sign-in, payments, hosting | ₹199 each, or ₹499/mo |
It teaches you what people actually ask for — which occasions, how many photos, what they want written — and you'll earn more per booklet than a subscription makes in a month. Build the SaaS once the same request has arrived ten times.
Step 5: Turn it into a product site
To charge for it you need three things the static folder doesn't have: accounts, payments, and a gate on the download. The cheapest honest way is a small Next.js app wrapping the editor you already built.
cd ~/Desktop/booklet-saas
claude
I have a working static booklet editor in ~/Desktop/booklet-gift (index.html, book.js,
render.js, editor.js, gift.js and CSS). Wrap it in a Next.js 15 app I can sell access to.

1. Create a Next.js app with the App Router and TypeScript in this folder.
2. Copy my static editor into /public/app/ and serve it at /editor inside an iframe that
   fills the viewport, so I can keep improving the editor as plain files.
3. Auth with Supabase and Google only:
   - Use @supabase/ssr. Add a browser client, a server client, and middleware that refreshes
     the session on every request.
   - A /login page with one button: "Continue with Google", calling signInWithOAuth with
     redirectTo pointing at /auth/callback.
   - An /auth/callback route that exchanges the code for a session and redirects to /editor.
   - /editor and /api/* must redirect to /login when there is no session.
4. Database (SQL I can paste into the Supabase SQL editor):
   - profiles: id uuid references auth.users primary key, email text, created_at timestamptz.
   - purchases: id uuid, user_id uuid references auth.users, razorpay_order_id text unique,
     razorpay_payment_id text, amount int, status text, created_at timestamptz.
   - Row Level Security ON for both, with policies letting a user read only their own rows and
     no client write access to purchases at all.
   - A trigger that inserts a profile row when a new auth user is created.
5. Payments with Razorpay:
   - POST /api/checkout — verify the session, create a Razorpay order with the Orders API for
     the amount in paise, insert a purchases row with status "created", return the order id.
   - The client opens Razorpay Standard Checkout with that order id.
   - POST /api/verify — recompute HMAC-SHA256 of "<order_id>|<razorpay_payment_id>" with the
     key secret and compare it to razorpay_signature with a timing-safe comparison. On match,
     set the purchase to "paid". Reject anything that doesn't match.
   - POST /api/webhook — verify the x-razorpay-signature header against the raw request body
     using the webhook secret, and mark payment.captured events paid. This is the source of
     truth: the browser can be closed before /api/verify ever runs.
   - Never trust an amount, a status or a user id sent from the browser. Read the price from
     the server and the user from the session.
6. The gate: the editor's "Download gift" button calls GET /api/entitlement first. The server
   answers yes only if that user has a paid purchase. If not, open the payment flow. Put the
   check on the SERVER — a client-side check is a five-second bypass.
7. Env vars in .env.local and documented in README:
   NEXT_PUBLIC_SUPABASE_URL, NEXT_PUBLIC_SUPABASE_ANON_KEY, SUPABASE_SERVICE_ROLE_KEY,
   RAZORPAY_KEY_ID, RAZORPAY_KEY_SECRET, RAZORPAY_WEBHOOK_SECRET, NEXT_PUBLIC_RAZORPAY_KEY_ID,
   NEXT_PUBLIC_SITE_URL. The service role key must never be imported into a client component.
8. Then tell me, in order, exactly what to click in Google Cloud Console, Supabase and
   Razorpay to get each value, and how to test the whole flow with Razorpay test keys.
Step 6: Add Google sign-in with Supabase
Supabase gives you the accounts; Google gives you the button. You are wiring one to the other.
- Create the Supabase projectCopy the Project URL and anon key from Settings → API. Copy the service role key too, and treat it like a password — it bypasses every security rule.
- Create the Google credentialsGoogle Cloud Console → APIs & Services → OAuth consent screen → External. Then Credentials → Create credentials → OAuth client ID → Web application.
- Set the redirect URIExactly
https://YOUR-PROJECT-REF.supabase.co/auth/v1/callback - Paste it backSupabase → Authentication → Providers → Google → on, paste the Client ID and Secret, save.
- Add your site URLsSupabase → Authentication → URL Configuration: Site URL is
http://localhost:3000while developing; add your Vercel domain once you have it.
The redirect URI goes to Supabase, not to your own website. People paste their own domain there, get redirect_uri_mismatch, and lose an hour to it. Your app's callback is a separate setting inside Supabase.
Step 7: Take payments with Razorpay
Razorpay is the easiest way to accept UPI, cards and netbanking in India. Test mode takes five minutes; going live needs KYC, which takes a day or two — start it now if you intend to sell.
The simplest version — no code
Razorpay Dashboard → Payment Links → create a link for ₹299 → send it in the DM. They pay, you get an email, you send the booklet. This is how your first ten "done for you" sales should work. Skip the rest of this section until that's boring.
The SaaS version — in code
- Get test keysSettings → API Keys → generate. You get
rzp_test_…and a secret. - Create an orderServer-side, amount in paise — ₹299 is
29900— and return its id. - Open CheckoutThe browser opens Razorpay Standard Checkout with that order id and your public key.
- Verify the signatureHMAC-SHA256 of
order_id|payment_idwith the key secret, compared timing-safely on your server. - Add the webhookSettings → Webhooks →
https://yourdomain.com/api/webhook, eventpayment.captured, and verifyx-razorpay-signatureagainst the raw body.
| Rule | Why |
|---|---|
| Amounts are in paise | ₹299 is 29900. Send 299 and you've charged ₹2.99 |
| Never take the price from the browser | Anyone can edit it. Read it on the server |
| The webhook is the truth | The customer can close the tab before your verify call fires |
| Test cards only in test mode | Razorpay's 4111 1111 1111 1111 with any future expiry |
| Keep the secret server-side | Only the public key id may reach the browser |
Step 8: Gate the download
This is the only line of business logic in the whole product: a user may download a gift file if and only if the server can see a paid purchase row for that user.
Put the check in the API route that hands over the file, not in the editor. A client-side check — hiding the button, setting a flag in localStorage — is bypassed in five seconds with dev tools, and the people most likely to try are the least likely to pay.
Sensible free tier: let anyone build a booklet and see it in preview. Charge only at Download gift. They've already done the emotional work of choosing the photos by then, which is the moment ₹299 feels small.
Step 9: Go live on Vercel and connect a domain
Add every environment variable in Vercel → Settings → Environment Variables, and add them to Production, Preview and Development — a variable scoped to production only will break your previews with confusing auth errors. Then add your live domain to Supabase's URL configuration and to the Razorpay webhook.
For a GoDaddy domain: Vercel → Settings → Domains → add it, then in GoDaddy → DNS point the @ A record and the www CNAME at the values Vercel shows you. Always copy the exact values from your own dashboard. DNS usually settles within an hour.
Step 10: Price it and deliver it
| Offer | What they get | Price to test |
|---|---|---|
| Single booklet, done for you | You build it from their photos, 5–7 spreads, delivered as a file | ₹799 |
| Occasion package | Booklet plus a 15-second screen recording for their story | ₹1,499 |
| Wedding or farewell booklet | 12–15 spreads, their colours, two rounds of changes | ₹2,500–₹5,000 |
| Self-serve download | They make it on your site and pay to download | ₹199–₹299 |
| Unlimited month | For someone making gifts through a whole wedding season | ₹499/mo |
Delivering without a website: take the photos and the note over WhatsApp, build it, send a Razorpay payment link, send the file once paid. Ask for the occasion, the names, 8–12 photos, and one line they'd want said. That's the entire intake.
Build the Instagram page that sells it
The product is emotional and visual, which is exactly what the platform rewards. You're not selling software — you're selling the moment someone opens it.
npx vercel --prod
| Format | What to show | Why it works |
|---|---|---|
| The open | Close-up screen recording of the book opening and one page turning. No talking | Sells itself in four seconds. This is your pinned reel |
| The reveal | Someone receiving it, filmed over their shoulder | Proof that the feeling is real |
| Before → after | A boring WhatsApp photo dump on one side, the booklet on the other | Makes the value obvious without explaining it |
| The build | 30 seconds of you dragging photos in and typing a note, sped up | Shows it's fast, which makes ₹799 look generous |
| The occasion post | "Booklets for: birthdays · anniversaries · farewells · Raksha Bandhan" | Tells people when to come back |
Highlights: Booklets · Prices · How it works · Reviews. Rhythm: three reels a week, all some version of the open or the reveal, and post occasion content a week before the occasion — people buy gifts in advance. Comments into orders: put "Comment BOOK and I'll send the details" on every reel; the comment is what makes the reel travel.
You are handling other people's family photos. Always ask before using a client's booklet in your content, blur faces if they hesitate, and never reuse their photos in another buyer's sample. One screenshot posted without permission costs more than the sale was worth.
DM scripts
Personalised digital booklets 🎁
Your photos → a real book they open on their phone
Delivered in 24 hours · from ₹799
↓ order here
Hi [Name]! Saw your story about [friend]'s birthday 🎂

I make digital booklets — your photos become a small book they actually open and
turn the pages of, on their phone. It's not a video or a collage.

Here's one I made: [your demo link]

Send me 8–10 photos and one line you'd want written, and I'll have it ready in
24 hours. ₹799.
Hello [Name], I build digital keepsake booklets and I think they'd sit well
alongside what you already deliver.

After the album, couples have nothing to send their guests. I make a small book
they open on their phone — photos, a note, their colours — delivered as one file
with no app and no link that expires.

Demo: [your demo link]

I can white-label it under your studio name. Want me to make one from a recent
shoot so you can see it with your own work in it?
Skills you'll learn, and how to put this on your resume
| Skill | What you learn |
|---|---|
| CSS 3D and animation | Perspective, hinged transforms, backface visibility, container queries |
| Vanilla JavaScript architecture | State, pointer events, drag and drop, IndexedDB and localStorage |
| Product thinking | Free tier, paid gate, and where the paywall belongs emotionally |
| OAuth and sessions | Google sign-in through Supabase, SSR sessions, route protection |
| Payments | Razorpay orders, signature verification, webhooks, idempotency |
| Shipping | Vercel, environment variables, DNS, and selling something real |
- Built a browser-based booklet editor in vanilla JavaScript with a CSS 3D page-turn engine, direct-manipulation editing (drag, rotate, resize) and local-first persistence in IndexedDB.
- Implemented single-file export: layouts and images serialised into one self-contained HTML document that runs offline with no server or dependencies.
- Shipped it as a paid product on Next.js with Supabase Google OAuth, server-verified Razorpay payments including webhook signature validation, and server-side entitlement checks on every download.
Frequently asked questions
Do I need to know how to code?
No, but you need to be able to read an error and paste it back to Claude Code. That's the actual skill.
Can I sell booklets without building the SaaS half?
Yes, and you should start that way. A payment link and your laptop are enough for your first ₹20,000.
Why is the gift file so large?
Because every photo is embedded in it — that's what makes it work offline forever. Fewer photos, or a smaller downscale size, brings it down.
Can they edit the booklet I sent them?
No. The gift file is a reader. That's deliberate: you keep the editable version, so they come back to you for changes.
Does the music work offline?
No. The booklet does; the YouTube music needs internet. Say so when you deliver it.
Is it safe to put other people's photos on my site?
Only with permission, and only what you need. In this build the photos never leave the user's own browser, which is a genuine selling point — say it out loud.
What if Razorpay hasn't approved my KYC yet?
Build with test keys, and use Payment Links or UPI for real sales meanwhile. Don't wait on KYC to start selling.
Build 100 AI Projects With Me
This is one of the 100 AI projects I'm building to help you learn AI by making real things. Comment "BOOKLET" on the reel and I'll send you both prompts and this full guide.
Follow on Instagram →