Build a Book Spine Bookshelf Website Template With One Prompt and Sell It to Education Creators
Build a book spine bookshelf website template — every book standing side by side, spine out, filtered by category — with one Claude Code prompt and a Google Sheet, then sell it to education creators.
In this guide
- What you're building
- Why this template sells
- Before you start
- Step 1: Create the Google Sheet
- Step 2: Add the colour scheme
- Step 3: Share the sheet
- Step 4: Paste the prompt
- What the prompt tells Claude
- Check the live updates
- Step 5: Go live on Netlify
- Or go live on Vercel
- Connect a GoDaddy domain
- Step 6: Sell it
- DM scripts for buyers
- Skills and resume
- FAQ
AI Side Hustles · Build and Sell
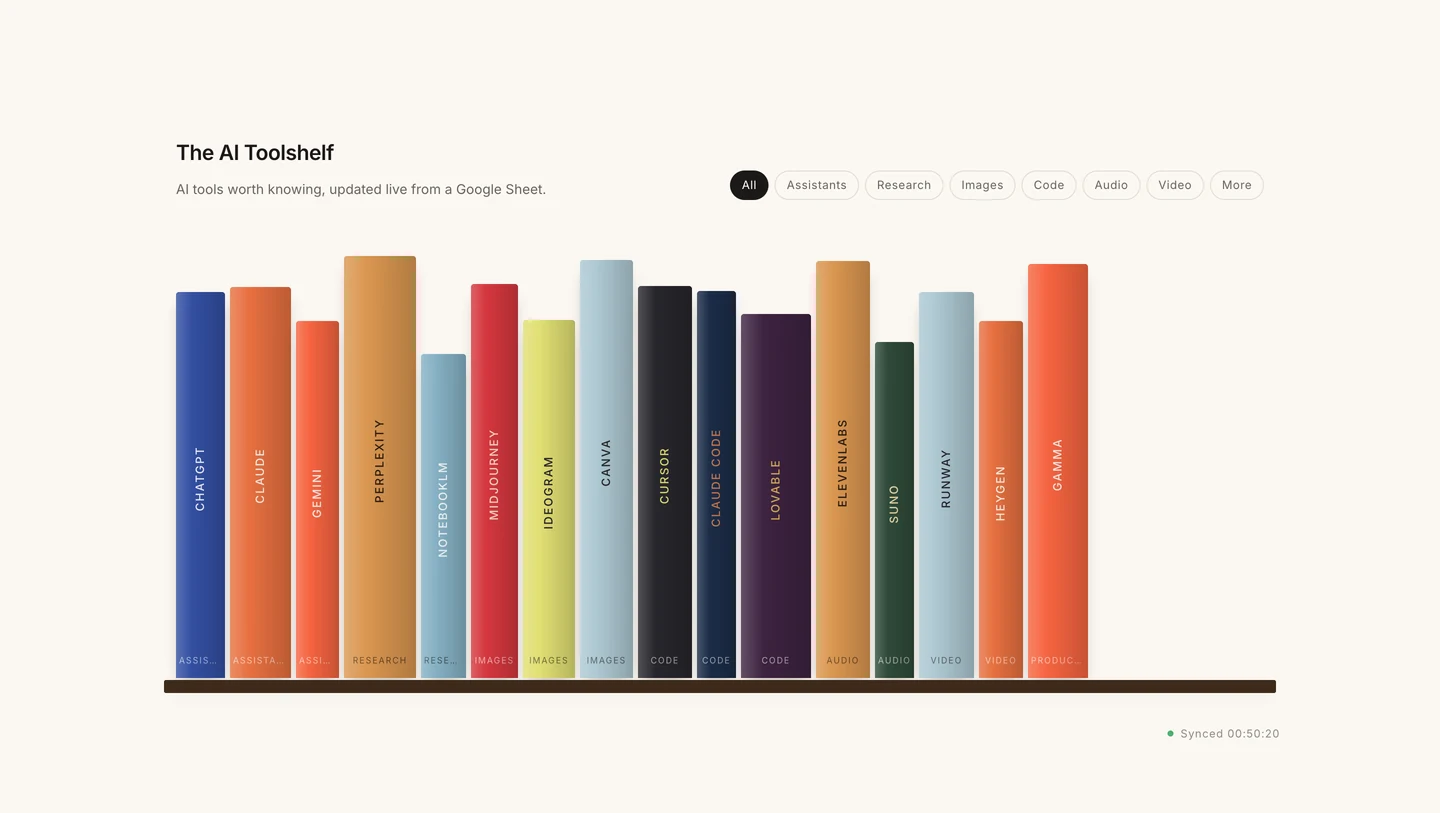
A book spine bookshelf website template — the spine wall — is a premium-looking page where every course, set of notes or prompt pack stands on one shelf as a book, spine out, beside all the others — so a visitor sees the whole collection at a glance and can filter it by category. You can build one with a single Claude Code prompt, run all of its content from a Google Sheet, publish it free on Netlify or Vercel, and sell it to education creators, coaches and teachers. Sell it for ₹300 to 1,000 people and that's ₹3,00,000 in revenue.
What you're building
The template is a full-width shelf of spines. Every book stands upright next to the others, spine out, in its own colour, with its category printed at the foot — the way a real shelf looks when you walk past it. Above the shelf sits a row of category chips, so a visitor can narrow a long shelf to just "Class 10" or just "Notes" without the books moving. Clicking a spine opens that book full screen: the cover on the left, the title, description and a button on the right, and arrows to move along the shelf.
This one is the book spine bookshelf, also called the spine wall: the whole shelf visible at once, every book standing spine out, filtered by category. The other one is the carousel bookshelf: a 3D room where one book faces the reader at a time and the walls change colour with its cover. Same Google Sheet, same prompt structure, completely different page.
All of the content lives in a Google Sheet, not in the code and not in the prompt. You create the sheet once, give its link to Claude Code, and from then on, editing the sheet updates the live website by itself. That's what makes it easy to sell: your buyer changes their own books from a spreadsheet, and you never have to rebuild anything.


Why education creators pay for this
Most education creators share their courses, notes and resources through a plain link-in-bio page, a long WhatsApp message or a Google Form. A shelf of spines turns that list into something students actually want to explore, and the category chips keep it usable once there are thirty books on it. It looks like a premium product, which makes the creator's paid courses look premium too.
- It fits how educators already think. Courses, subjects, notes and workbooks are naturally "books on a shelf".
- They can update it themselves. Adding a new course is just a new row in the sheet, with no developer involved.
- It works everywhere. Students open it on their phones from an Instagram bio or a WhatsApp link.
- It's low risk to buy. At ₹300, it costs less than one student's course fee.
₹300 × 1,000 buyers = ₹3,00,000. The template costs you nothing to copy, so every sale after the first build is margin.
That figure is revenue, not a promise. Reaching 1,000 buyers takes consistent outreach and content. Start with 10 sales, collect testimonials, and grow from there.
Before you start
This guide assumes you already have Claude Code, Node.js and Python installed. If not, follow the official Claude Code setup guide first. You'll also need a Google account and a free Netlify or Vercel account.
macOS Mac
- Install Claude Code in Terminal:
curl -fsSL https://claude.ai/install.sh | bash
- Install Node.js LTS from nodejs.org.
- Check Python with
python3 --version.
Windows PC
- Install Claude Code in PowerShell:
irm https://claude.ai/install.ps1 | iex
- Install Node.js LTS from nodejs.org.
- Install Python from python.org and tick "Add python.exe to PATH".
Create the Google Sheet
The Google Sheet is your website's content manager. Create it before you touch Claude Code, because the prompt needs its link. Go to sheets.new, rename the first tab at the bottom to Books, and type these eight column headers into row 1, in this order.
| Column | What to type | Example |
|---|---|---|
| Order | The book's position on the shelf: 1, 2, 3… | 2 |
| Book name | Title on the cover. Keep it short. | Class 10 Maths |
| Subheading | One short line under the title | Full syllabus in 40 videos |
| Description | Two or three sentences shown when the book opens | Every chapter explained with solved board questions… |
| Button text | The label on the button | Enrol now |
| Button link | Where the button goes | https://rzp.io/l/maths10 |
| Colour code | A code from the Colours tab (Step 2) | C05 |
| Category | The group this book belongs to. Every different value becomes a filter chip above the shelf. Leave the whole column out and the chips simply don't appear. | Class 10 |
Then fill in one row for every book. Five to nine books looks generous on the shelf, and because the spines are thin this layout still reads well at thirty or more — that's what the Category chips are for. Reuse the same category word exactly (“Class 10”, not “class 10”) so it becomes one chip, not two.

Instead of typing the headers yourself, make a copy of the Spine wall book shelf sample sheet. It already has both tabs, all eight columns, 8 sample books and 12 colours. Replace the sample rows with your own and the shelf follows.
Adding more details later
You can add extra columns, such as Price, Duration or Language, at any time. The website ignores columns it doesn't know about, so nothing breaks. To actually show a new column on the website, tell Claude Code once, for example: "Show the Price column under the subheading." After that, the column updates from the sheet like everything else.
Add the colour scheme
Click + at the bottom of the sheet to add a second tab, and name it Colours. Add four headers: Colour code, Colour name, Cover colour and Text colour. Then add one row per colour.

| Code | Name | Cover | Text |
|---|---|---|---|
| C01 | Haze | #ADC8D2 | #27262C |
| C02 | Charcoal | #27262C | #E1DF73 |
| C03 | Tangerine | #E77040 | #FBF0E4 |
| C04 | Citron | #E1DF73 | #27262C |
| C05 | Cobalt | #334FA2 | #EEF2FB |
| C06 | Vermilion | #F66440 | #FDEFEA |
| C07 | Ochre | #DA9650 | #2B1D12 |
| C08 | Crimson | #D5373E | #F8D9C8 |
| C09 | Ultramarine | #1B2C48 | #C9774B |
| C10 | Aubergine | #3D2340 | #D7AD5A |
| C11 | Forest | #2F4A3A | #E9D8A6 |
| C12 | Powder blue | #86B1C4 | #F2F7F8 |
Now go back to the Books tab and type a colour code, such as C05, in each book's Colour code cell. The cover colour becomes the book's cloth and the text colour becomes its foil title. The website works out the wall, floor and lighting from those two values, so the whole room changes to match each book.
- Brand it for a buyer. Swap in the creator's brand colours and every book using that code changes.
- Group by subject. Give Maths one colour and Science another, so students can scan the shelf.
- Raw hex works too. You can type
#334FA2directly in the Colour code cell.
Create a folder and paste the prompt
Create a folder on your Desktop called bookshelf-template and open Claude Code inside it. Everything Claude Code builds is saved in this folder, and it's the same folder you'll upload to Netlify later.
macOS Terminal
Windows PowerShell
Or, in the Claude desktop app, open the Code tab and choose the folder. Then copy the prompt below, replace PASTE_YOUR_SHEET_LINK_HERE on the first line with your sheet link, and press Enter.
My Google Sheet: PASTE_YOUR_SHEET_LINK_HERE

Build me a bookshelf website whose books stand side by side on one shelf, spine out, and whose content comes entirely from the Google Sheet above. When I edit the sheet, the live website must update by itself, without redeploying. Never hard-code any book content in the code.
Work only inside the current folder and save every file here.

PART 1 — CHECK THE SHEET FIRST
1. Extract the sheet ID from my link. Fetch both tabs as CSV from:
   https://docs.google.com/spreadsheets/d/SHEET_ID/gviz/tq?tqx=out:csv&sheet=Books
   https://docs.google.com/spreadsheets/d/SHEET_ID/gviz/tq?tqx=out:csv&sheet=Colours
2. If Google returns an HTML page instead of CSV, stop and tell me: "Your sheet isn't shared. Click Share → Anyone with the link → Viewer, then tell me to try again."
3. Check the Books tab has these columns: Order, Book name, Subheading, Description, Button text, Button link, Colour code, Category. Category is optional: if it is missing or empty, build the shelf without filter chips and say so. Check the Colours tab has: Colour code, Colour name, Cover colour, Text colour. If any are missing or misspelt, list exactly which ones and wait for me to fix them.
4. Show me a short summary: how many books you found, their names, and any row with a colour code that isn't in the Colours tab.
5. Then ask me just two things: the shelf's name and a one-line subtitle. After that, build without asking anything else.
Also check whether I'm on macOS or Windows and use the right commands (python3 on Mac, python on Windows).

PART 2 — READING THE SHEET IN THE WEBSITE
- Put settings in config.js: sheet (my link), booksTab "Books", coloursTab "Colours", refreshSeconds 15, name, subtitle, background (the page colour) and shelfTone (the colour of the plank). config.js must be the only file I ever need to edit.
- Read each tab with fetch from the gviz CSV URLs above, with a timestamp added and cache: "no-store".
- Write a proper CSV parser that handles quoted fields, commas and line breaks inside quotes.
- Match headers loosely (ignore case, spaces and punctuation). Ignore any extra columns I add later.
- Skip rows without a Book name. Sort by Order.
- Colour code may be a code from the Colours tab or a raw hex. If unknown, use a palette colour and log a console warning.
- Add https:// to links that don't have it.
- If the sheet isn't public, show: "The sheet is not public. Share it as Anyone with the link: Viewer."
- Check the sheet every refreshSeconds and when the browser tab becomes visible. If the data changed, rebuild the shelf, keep the same book selected and the same category chip active if they still exist, and show a toast: "Shelf updated from the sheet · N books".
- Never rebuild while a book is open; apply the update when it closes.
- Bottom-right, show "Synced HH:MM:SS" with a small green dot, or "Sheet unreachable, retrying".

PART 3 — THE WEBSITE
Tech: index.html, styles.css, config.js and JavaScript modules in src/. No build step, no backend, no framework, no image or audio files. Draw every book in CSS and generate the sounds in code. Do not use Three.js or any 3D library.
The shelf: one long wooden plank across the page with the books standing on it, spine out, side by side, filling the width — the way a real shelf looks when you walk past it. Not a carousel, not a room, and never one book turned to face the reader.
The spines: give each one its own width, height and a slight tilt, derived from its title so it stays the same on every reload and the row looks hand-arranged rather than printed. Cover colour is the spine, Text colour is the lettering. The book name runs vertically up the spine in spaced small caps, shrinking to fit. A thin foil rule near the top and the Category in small type at the foot. Rounded top corner, a soft shadow onto the plank, and a lift when hovered or focused.
Category chips: above the shelf on the right, a row of pills — "All" first, then one per category in the order they appear in the sheet. Show at most 7 and collapse the rest behind a "More" button. Choosing a chip keeps every book exactly where it is and fades the ones that don't match, so the shelf never jumps or reflows.
Open view: clicking a spine opens that book full screen over a background tinted from its cover colour. Left, the hardcover standing at a slight angle with the title and category on it. Right: the category in small caps, a huge serif title, the subheading in italic, the description, and an outlined pill button with the Button text that opens the Button link in a new tab (rel="noopener noreferrer"; hide it if there is no link). Under that, a ( 2 / 16 ) row to move along the shelf. Escape or the × closes it.
Layout: top-left, name and subtitle. Top-right, the category chips. Bottom-right, "Synced HH:MM:SS" with a small green dot.
Sound: Web Audio ambient pad with gentle chimes and small interaction sounds, starting on the first click; mute button and volume slider in the open view, both saved in localStorage.
Mobile under 820px: the header stacks, the chips scroll sideways, and the shelf scrolls horizontally with the plank running under it.
Also: a loading state, a plain list of titles, descriptions and links in the page for search engines and screen readers, prefers-reduced-motion support, aria labels and a live region.

PART 4 — RUN AND PROVE IT WORKS
1. Start a local server on port 4322 and give me the localhost link.
2. Confirm the page loaded the same number of books as my sheet.
3. Ask me to change one cell in the sheet, and confirm the change appears on the page without a reload.

PART 5 — PUBLISH
Give me step-by-step instructions for two options: Netlify (drag-and-drop with a free account) and Vercel (npx vercel --prod). Then explain how to connect a domain bought on GoDaddy to whichever one I choose.

What each part of the prompt tells Claude
The prompt is split into five parts so Claude Code does the work in a safe order: check your sheet, wire it up, build the design, prove it works, then explain how to publish.
| Part | Instruction to Claude | Why it matters |
|---|---|---|
| Sheet link (line 1) | Use this sheet as the only source of content | Your books never live in the prompt, so you never edit or re-run it to change content |
| 1 · Check the sheet | Confirm it's shared, the columns are right and the colour codes exist, then ask only for a name and subtitle | Catches the most common mistakes before a single file is written |
| 2 · Read the sheet | Fetch tabs as CSV, parse safely, ignore extra columns, check for changes, update without interrupting readers | This is the system that makes the website update itself |
| 3 · The website | The shelf, the spines, the category chips, the open view, sound and the mobile layout | Detailed design language gives the premium look that buyers pay for — and the line "not a carousel, never one book facing the reader" is what keeps Claude from building the other bookshelf |
| 4 · Run and prove | Start a local server, match the book count, test a live edit | Claude has to show it works, not just say so |
| 5 · Publish | Netlify and Vercel steps, plus a GoDaddy domain | You finish with a link you can sell from |
Check the live updates on localhost
When Claude Code finishes, it gives you a link like http://localhost:4322. Localhost means the website is running only on your computer, so you can test it before anyone else sees it.
- Open the linkBrowse the shelf, open a book and click its button to check the link.
- Edit the sheetKeep the page open, change a book's subheading in your Google Sheet, or add a new row.
- Watch it updateWithin 15 to 60 seconds, the change appears with a "Shelf updated from the sheet" message, without refreshing.


Go live on Netlify
Netlify hosts static websites for free, and this template is a static folder. Your content stays in the Google Sheet, so you only upload the folder once.
- Log inCreate a free account at app.netlify.com/signup and stay logged in.
- Open Netlify DropGo to app.netlify.com/drop.
- Drag in the folderDrag
Desktop/bookshelf-template, the folder containingindex.html, onto the page. Netlify gives you a live address. - Rename the addressOpen Site configuration → Change site name to get something like
maths-with-priya.netlify.app.
Sheet edits go live on their own. Only redeploy when you change the code or design: open your site in Netlify, go to Deploys, and drag the updated folder in.
Or go live on Vercel
Vercel's free Hobby plan works just as well. Create an account at vercel.com/signup, then run this inside your project folder, or ask Claude Code to run it for you:
The first time, it opens your browser to log in and asks a few setup questions. Accept the defaults and leave the build command empty. When it finishes, it prints your live address, such as bookshelf-template.vercel.app. Run the same command again whenever you change the code.
Connect a GoDaddy domain
A custom domain like priyamaths.com makes a template feel even more premium, and it's an easy upsell for buyers. Buy the domain on GoDaddy, add it to your host, then point GoDaddy's DNS records at it.
Netlify Option A
- Site → Domain management → Add a domain.
- In GoDaddy: My Products → domain → DNS.
- Set the A record for
@to the IP Netlify shows (currently75.2.60.5). - Set the CNAME for
wwwto your.netlify.appaddress.
Vercel Option B
- Project → Settings → Domains → add your domain.
- In GoDaddy: My Products → domain → DNS.
- Set the A record for
@to the IP Vercel shows (commonly76.76.21.21). - Set the CNAME for
wwwto the value Vercel shows.
Always copy the exact values your dashboard shows. DNS usually works within an hour but can take up to 48 hours.
Sell it to education creators, coaches and teachers
Your own live shelf is your demo. Put its link in your bio, record a 15-second screen recording of a book opening, and use both in every pitch. There are two ways to sell the same template.
| Offer | What the buyer gets | How you deliver it | Price to test |
|---|---|---|---|
| DIY template | The website folder, a copy of the sheet, and setup instructions | They copy the sheet, paste its link into config.js, and drag the folder into Netlify | ₹300 |
| Done for you | A live shelf with their courses, their colours and their own sheet | You fill their sheet, deploy it, and share the sheet with edit access | ₹2,000–₹5,000 |
| Premium setup | Done for you, plus a GoDaddy domain connected | As above, plus DNS setup on their domain | ₹5,000–₹10,000 |
How to deliver a DIY template
- Zip the folderCompress your
bookshelf-templatefolder and upload it to Gumroad, Topmate or Instamojo as the product file. - Include a blank sheetShare a copy link of a clean sheet with both tabs and sample rows, so buyers start with the right columns.
- Add a short setup videoShow copying the sheet, pasting its link into
config.jsand dragging the folder into Netlify. It removes almost every support question.
Who to sell to
- Education creators on Instagram and YouTube with several courses or resources to link.
- Tutors and coaching institutes sharing notes, batches and test series.
- School teachers building a class resource library.
- Coaches and course sellers who want a premium storefront for their programmes.
DM scripts for buyers
Always send a live demo link. A demo built with the buyer's own course names converts far better than a generic pitch.
Hi [Name]! I've been learning from your [subject] content.

I noticed your courses and notes are shared as a list of links. I build bookshelf pages where every course stands on a shelf as its own book, students filter by subject, and tapping a book goes straight to enrolment.

Here's a live demo: [your demo link]

The best part: you update it yourself from a Google Sheet, so adding a new course takes 10 seconds. Want me to make a quick preview with two of your courses?
Hello [Name], I help teachers share their notes and courses in a way students actually enjoy.

It's a bookshelf website: each subject or batch is a book standing on a shelf, students filter by class or topic, and tapping a book opens notes or a payment page. It works on any phone, and you manage everything from a Google Sheet.

Demo: [your demo link]

I can set it up with your subjects this week. Shall I send a sample with your class names?
Skills you'll learn, and how to put this on your resume
| Skill | What you learn |
|---|---|
| HTML, CSS, JavaScript | How a real website is structured, styled and made interactive |
| Advanced CSS | Building an illustrated interface — gradients, transforms, shadows and transitions — with no images and no 3D library |
| Google Sheets as a CMS | Running a live website from a spreadsheet, with no database |
| Deployment and DNS | Publishing on Netlify or Vercel and connecting a custom domain |
| Prompting AI coding tools | Writing structured, testable instructions for Claude Code |
| Selling a digital product | Pricing, packaging and pitching a template to real buyers |
Add it under Projects with your live link:
- Built and deployed a bookshelf website template in vanilla JavaScript, HTML and CSS, rendering every book as a CSS-drawn spine with category filtering, an accessible open-book dialog and a responsive mobile layout, hosted on Netlify.
- Used Google Sheets as a no-backend content manager: the site reads sheet data as CSV, checks for changes every 15 seconds, and re-renders the shelf without a reload or redeploy.
- Packaged the project as a digital product for education creators, handling delivery, onboarding and custom-domain setup, built with AI-assisted development in Claude Code.
Frequently asked questions
How is this different from the other bookshelf guide?
Both run on a Google Sheet and one Claude Code prompt, but they build different pages. This one is the book spine bookshelf, or spine wall: every book stands side by side on a single shelf, spine out, filtered by category chips, and clicking a spine opens it. The carousel bookshelf is a 3D room where one book faces the reader at a time, the walls change colour with its cover, and you can turn the pages. Pick the book spine when there are many books to scan; pick the carousel when there are a few to show off.
Do I need to know coding?
No. You create the Google Sheet, paste the prompt with your sheet link, and Claude Code writes and tests all the code. You only need to follow the steps and check the result in your browser.
Why create the Google Sheet before running the prompt?
The prompt reads your content from the sheet, so it needs the link to start. Claude Code can't sign in to your Google account to create a sheet for you, and keeping content in the sheet means you never edit the prompt to change a book.
Can I add more columns later?
Yes. Extra columns are ignored, so nothing breaks. To show a new column on the website, ask Claude Code once, and from then on it updates from the sheet automatically.
Do I have to redeploy when I change a book?
No. Sheet edits appear on the live website within about a minute. You only redeploy when you change the code or design.
Can buyers edit my Google Sheet?
No. Your sheet is view-only by link. Each buyer gets their own copy of the sheet, which only they can edit.
Is ₹3 lakh a realistic income?
₹300 × 1,000 sales is ₹3,00,000 in revenue, but it depends entirely on how many buyers you reach. Treat it as a target to work towards, and start by getting your first 10 sales and testimonials.
Build 100 AI Projects With Me
This is one of the 100 AI projects I'm building to help you learn AI by making real things. Comment "GUIDE" on the reel and I'll send you the prompt, the sample sheet and this full guide.
Follow on Instagram →