Build a Portfolio Website With a Talking Intro Video Using ChatGPT, Google Flow and Aboveyellow
Turn one selfie into a portfolio website with a talking intro video: two prompts for ChatGPT and Google Flow, then an Aboveyellow template. In an hour.
You can build a portfolio website whose hero is a video of you introducing yourself, starting from one selfie, in about an hour. ChatGPT turns your photo into a photoreal 16:9 still of you at a desk, Google Flow animates that still into a 10-second talking clip that speaks your script, and an Aboveyellow template holds it as a looping video hero with your résumé underneath. Two prompts, both below, in full.
What You Are Building
A single-page portfolio site. The top of the page is a video of you saying one sentence about who you are, filling the frame on a loop. Below it sit the ordinary sections a recruiter looks for: what you are looking for, education, skills, experience, achievements, projects, certifications, contact.
Nobody has to install anything or sign in. You send one link, and it opens on a phone.
The reason this works is that it solves the one problem a résumé cannot: a recruiter reading a PDF has no idea what you are like. Ten seconds of you talking answers that before they scroll.
What you will need: ChatGPT for the still image, Google Flow for the video, an account on aboveyellow.com/portfolios for the site, one clear photo of your face, and your résumé text ready to paste.
Step 1 — Pick the Reference Photo First
Everything downstream inherits from this file. The image model copies the face it can see, and the video model copies the image. A bad reference costs you three regenerations, so choose it before you open anything else.
Front-facing, eyes open
A three-quarter turn or a downward gaze is where the likeness starts to drift.
Face unobstructed
No sunglasses, no hand on the chin, no hair across the eyes.
Soft, even light
Window light beats flash. Hard shadows get baked in and read as different bone structure.
You alone in the frame
Crop anyone else out before uploading, or features get blended together.
Sharp, and reasonably large
Your head should be at least a few hundred pixels tall. A compressed group-photo crop has no detail left to preserve.
Recent
Whoever opens this link may meet you on a call next week.
Write your résumé lines now, before you open the builder. Step 4 asks for education, skills, three roles, achievements, projects and certifications in one sitting. Having that text ready is the difference between twenty minutes and two hours.
Step 2 — Generate the Still in ChatGPT
Upload your reference photo and paste the prompt below in the same message. You are asking for one photoreal frame: you seated at an ivory table in a warm home office, 16:9, hands folded and visible, nothing on the desk.
The prompt is long because every clause is load-bearing. It ranks facial likeness above styling, refuses beautification by name, and keeps the tabletop empty so a headline can sit over the frame later.
Create a photorealistic image of the SAME PERSON shown in the uploaded reference photo, seated in a warm, elegant home office. Generate a single still image in horizontal 16:9 format, ideally 3840 × 2160 pixels.

FACE AND IDENTITY — HIGHEST PRIORITY
Use the uploaded photo as the identity reference. Preserve the person's actual facial appearance as closely as possible: face shape, facial proportions, eye shape and spacing, eyebrows, nose, lips, jawline, cheeks, forehead, hairline, skin tone, age, and distinctive features.
Keep their natural facial asymmetry, skin texture, and visible identifying details. Retain their hairstyle and facial hair, if present. Do not beautify, reshape, slim, de-age, enlarge the eyes, smooth away skin texture, or substitute a generic attractive face.
The result must look like a real photograph of the reference person in a new setting. Prioritize facial likeness over styling. Preserve the reference expression if changing it would reduce resemblance.

PHOTOGRAPHIC STYLE
Render a real human with natural skin pores, fine facial hair, realistic eyes, individual hair strands, and believable anatomy. Use professional portrait photography with subtle depth of field.
No animation, cartoon styling, illustration, 3D rendering, CGI, doll-like features, waxy skin, or beauty filters.

CLOTHING
Dress the person in a plain off-white, round-neck, short-sleeved cotton T-shirt, loosely tucked into charcoal trousers. Include realistic fabric texture and natural folds. No logos or graphics.

SEATING AND POSE
Seat the person centrally in a dark charcoal office chair with curved armrests, behind an ivory tabletop.
Their torso faces the camera, with an upright but comfortable posture and relaxed shoulders. Both forearms rest naturally on the table, elbows slightly apart. Their hands meet gently at the centre, with one hand resting loosely over the other. Show both hands completely with anatomically correct fingers.
Have the person look into the camera with a relaxed, natural expression. Keep the face unobstructed.

BACKGROUND
Create a realistic, cozy home office with:
- A warm beige wall behind the person.
- A dark walnut bookshelf on the left, with concealed amber shelf lighting, a small dark abstract sculpture, a few neutral-colored books, and a dark ceramic vessel.
- A tall indoor plant with broad green leaves in a neutral textured planter on the right.
- A clean ivory tabletop across the foreground, with no objects on it.
Keep the background gently out of focus but recognizable. All materials should look physically real, including the wood grain, cotton fabric, leaves, and tabletop.

LIGHTING
Use soft, flattering light on the face, gentle natural shadows, and a subtle warm glow from the shelves. Keep the person's original skin tone accurate. Avoid excessive orange tint, harsh highlights, and dramatic lighting that obscures facial features.

CAMERA AND FRAMING
Use a horizontal 16:9 landscape composition with the camera straight ahead at eye level.
Keep the person centred and prominent. Frame from slightly above their head down to the tabletop, showing their waist, forearms, and complete hands. Leave a small, comfortable margin above the hair.
Fill the wider frame by extending the room on either side, balancing the bookshelf on the left and plant on the right. Do not make the person small or distant. Use a natural portrait perspective without wide-angle distortion.

FINAL REQUIREMENTS
The finished image should look like a genuine camera photograph of the uploaded person sitting in this room.
Preserve facial identity above all other visual choices. No text, watermarks, extra people, distorted anatomy, extra fingers, cropped head, cropped hands, borders, or black bars.

This is what Prompt 1 produces. The face is mine, the room is not.
Check these four things before moving on
It reads as you
Show it to someone who knows you and say nothing. If they hesitate, regenerate.
Count the fingers
Extra or fused fingers are the most common failure in this prompt, and they animate badly in the next step.
Nothing is cropped
Full head with margin above the hair, both hands inside the frame.
Save the original file
Download it at full size. A screenshot of the preview throws away half the pixels.
Step 3 — Animate It in Google Flow
Google Flow turns a still image into video. Upload your Step 2 image, choose the Omni model, and set the shot up before you paste anything:
| Setting | Value |
|---|---|
| Model | Omni — create video from image |
| Aspect ratio | 16:9 |
| Duration | 10 seconds |
| Input | Your Step 2 still, as the first frame |
Then edit one line of the prompt below — the script you want spoken — and run it.
Animate this exact uploaded image into a talking portrait. Preserve its original composition without any change in framing.

EXACT IMAGE MATCH
Use the uploaded image as the full video frame. The first frame must match the uploaded image exactly.
Keep the person's face, head, hair, shoulders, hands, desk, and background at their original size and position. Preserve the exact amount of space above the head and around the body.
Do not zoom in or zoom out. Do not make the person larger or smaller. Do not add extra headroom, extra background, padding, or borders. Do not crop any part of the original image.
Use the same aspect ratio as the uploaded image. Do not convert the portrait into a landscape composition.

LOCKED FRAME THROUGHOUT
Maintain this exact composition from the first frame to the last frame, including while speaking and during the ending.
No camera movement, push-in, pull-out, pan, tilt, reframing, automatic face tracking, or gradual change in scale.
The face must remain the same size and in the same position throughout. Background objects must remain fixed. No closing close-up or end-of-video zoom.

ANIMATION
Animate only the lips and jaw subtly for speech, occasional gentle blinking, and small smile changes.
Keep the head, torso, shoulders, arms, and hands in their original positions. Maintain direct eye contact. No head turns, nodding, leaning, swaying, or gestures.
Preserve the original facial identity, skin tone, hair, clothing, lighting, and colours. Do not redesign any part of the image.

VOICEOVER — IF/ELSE
IF the user supplies audio:
Use only that audio with its original voice and exact wording.
ELSE IF the user supplies a written script:
Speak only that exact script.
"Hi, I'm [YOUR NAME], a [YOUR ROLE] with [N] years of experience — [ONE LINE ON YOUR FOCUS]. Welcome to my portfolio."
ELSE:
Say exactly: "Hi, welcome to my portfolio."

For generated speech, use a smooth, warm adult voice with a natural medium-low pitch. Keep it gentle, clear, and conversational — not high-pitched, childish, nasal, or exaggerated.
Synchronise the lips accurately with the selected speech. Keep the lips softly closed before and after speaking.

BACKGROUND MUSIC
Add barely audible, soft instrumental ambience without vocals or strong beats. Keep the voice clearly dominant and lower the music further during speech.

TIMING
Target duration: 10–12 seconds, allowing enough time for the selected dialogue without rushing or cutting it off.
Speak once, then hold a soft smile. Finish with the exact same framing and subject size as the uploaded image.

FINAL REQUIREMENT
The video should look like the uploaded image itself is speaking. Only facial animation should change — not the camera view, crop, subject size, or composition.
Why the prompt is written this way
The frame lock exists because image-to-video models drift. Left alone, they add a slow push-in toward the face. On a website hero that loops every ten seconds, a creeping zoom is the single most amateur-looking result, which is why zoom, pan, tilt, reframing and automatic face tracking are each refused by name.
The animation block is deliberately tiny. Only lips, jaw, blinks and small smile changes move. Head turns and hand gestures are where uncanny artefacts appear, and they also break the illusion that the background is a real room.
The IF/ELSE structure stops the model writing your dialogue. There are three branches and no fourth: your recorded audio wins, otherwise your exact script, otherwise one fixed fallback line. Without that structure, video models happily invent a sentence you did not approve.
Write the script to the clock
Ten to twelve seconds is roughly 26 to 32 spoken words. The take ends on the model's clock, not on your last syllable, so a long script gets cut mid-sentence. Name, role, proof, invitation — in that order.
| Who | Script | Words |
|---|---|---|
| Product | "Hi, I'm Ritu Dadhwal, a product manager with seven years of experience — five in product management and two in software engineering. Welcome to my portfolio." | 26 |
| Engineering | "Hi, I'm [Name], a backend engineer with five years building payments infrastructure — most recently the systems behind a million transactions a day. Welcome to my portfolio." | 28 |
| Early career | "Hi, I'm [Name], a design graduate moving into product. I've shipped three real projects with real users, and they're all here. Welcome to my portfolio." | 24 |
Record it yourself if you can. The first IF branch takes your own audio with its original voice and exact wording. Your real voice beats a synthesised one on a page whose entire purpose is proving you are a specific, real person.
Check these five things before moving on
Frame one matches the still
Pause at 0:00 and compare. Same subject size, same headroom.
The last frame matches the first
Scrub to the end. Any creep in scale means regenerate — do not try to crop it out.
The lips land on the words
And close cleanly before and after the line.
The sentence finishes
No clipped final word, no rushing to fit.
It works muted
The hero autoplays silent, so the clip has to look composed with no sound at all. Download it as an .mp4 under 20 seconds.
Step 4 — Build the Site on Aboveyellow
Go to aboveyellow.com/portfolios and open the template called Red Black. It is the one built around a video hero. The builder runs in four moves: pick the template, edit it with your information, apply the changes, copy the link.

Red Black is the template on the left. Its sections are Hero, About, Education, Skills, Experience and Achievements — and every template is editable, with changes saved as you go.
Put the video in the hero
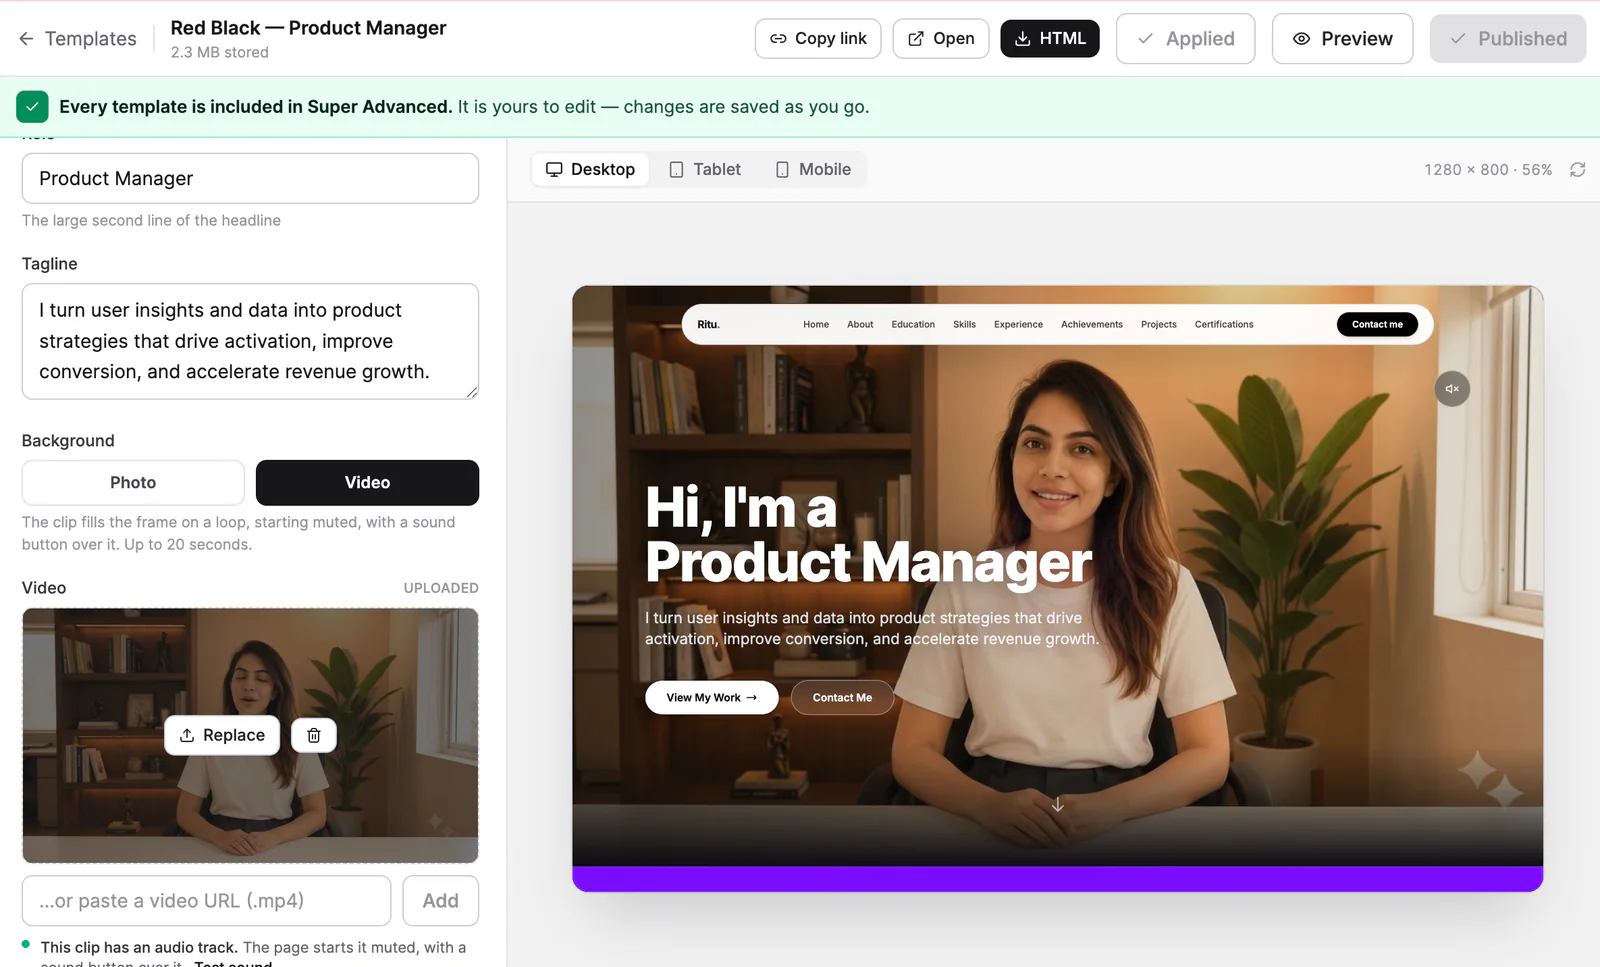
In the Hero panel, set Background to Video and upload your Step 3 .mp4. The clip fills the frame on a loop, starts muted with a sound button over it, and accepts up to 20 seconds — which is why a 10-second take is the right length rather than a compromise.
Then write the second headline line and the tagline underneath it.

Left: the fields. Right: the live preview. The uploaded clip is already playing behind the headline.
Write the tagline as if the sound never plays. Autoplay is muted by browser policy, and most visitors never press the sound button. The video makes you a person; the tagline has to carry what you actually do.
Fill the sections, then turn off the ones you cannot fill
Sections toggle on and off and reorder. Lead with whatever is strongest — Projects above Education if the work is the argument you want to make. An empty section left switched on reads worse than a shorter page.

Eight sections, each with a toggle and a count. Drag to reorder.

Every section is fielded: a kicker, a heading, then cards with an icon, body text and a footnote. Empty fields hide themselves, so leave a kicker blank rather than padding it out.
Pick one colour and leave it alone
Under Look there are four colourways, all on black:
| Colourway | Accent | Works when |
|---|---|---|
| Crimson | Red on black | The reference look, and the safe default |
| Cobalt | Electric blue on black | You want deliberate contrast with a warm-lit clip |
| Violet | Deep purple on black | Same, cooler and softer |
| Amber | Burnt orange on black | It sits with the amber shelf light in the hero |

The Darkening slider above this menu shades the video behind the words. Raise it for a bright clip, lower it for a dark one, and set it by one test: can you read the headline at a glance?
Check the Mobile preview before you apply anything. Most people open a portfolio link on a phone, where the crop is tighter and the headline sits over the busiest part of the frame.
Step 5 — Check It, Then Share the Link
Apply the changes and copy the link from the builder. Then, before you send it anywhere:
Open it in a private window
Confirms the page works for someone who is not signed in to anything.
Open it on a phone, on mobile data
The hero is a video. Watch how long it takes to start.
Read every date and job title against your résumé
A mismatch between the two is the one error here that actually costs interviews.
Check the contact section
A working address you read, and nothing you would not want published.
Send it to two blunt friends
Before you send it to a single recruiter.
Then put the link where it gets used: the header of your résumé next to your email, the featured section and website field on LinkedIn, and your email signature so every application carries it without you thinking about it.
Say what it is. The clip is an AI-generated likeness speaking your words, and some viewers will spot it. One line in your About section — that the intro was made with AI from your own photo and script — turns a possible objection into evidence that you ship with these tools.
When a Take Goes Wrong
Every one of these is a regeneration, not an edit. Fix the input and run it again — repairing an AI output downstream always shows.
| What you see | Why | What to do |
|---|---|---|
| The face is prettier, but it is not mine | The model resolved toward a generic attractive face | Regenerate with a front-facing, evenly lit reference, keep the "do not beautify" clause word for word, and add: match the reference face exactly, even if less flattering. |
| Extra or fused fingers | The hands overlap at the centre of the frame | Regenerate, or change the pose to both forearms on the table, hands apart, palms down. Separated hands fail far less often. |
| A portrait crop instead of 16:9 | The aspect ratio fell back to the default | Keep the ratio and pixel size in the first sentence of the prompt, and set the aspect in the tool as well. Never letterbox a portrait to fake a wide hero. |
| The video slowly pushes in | The animator's default camera drift | Keep the whole LOCKED FRAME block. If it drifts again, shorten the take to 10 seconds — drift compounds with length. |
| The head sways or gestures | "Talking portrait" was read as a performance | Re-run with the ANIMATION block intact: lips, jaw, blinks and micro-smiles only. |
| The voice sounds thin or childish | The voice description was too vague | Keep warm, medium-low pitch, gentle, conversational along with the four negatives. Better still, record twelve seconds yourself and use the audio branch. |
| The sentence gets cut off | The script is longer than the take | Cut to 26–32 words. Drop a clause, not the invitation at the end. |
| The headline is unreadable on the hero | A bright clip behind white type | Raise the Darkening slider until the headline reads at a glance, then check the Mobile preview, where the crop is busier. |
| The hero feels dead when the page loads | Muted autoplay, by design | Expect it. Carry the message in the tagline and leave the sound button visible. |
What You Can Do With This Project
Use it as your portfolio link
It is a live URL anyone can open, which counts for more than a PDF attachment. Put it in your résumé header, on LinkedIn, and in your email signature.
Put the build itself on your résumé
The project is small, but the process is the interesting part. Two bullets you can adapt:
- Built and shipped a personal portfolio site with an AI-generated video hero, using an image model for the still, an image-to-video model for the animated take, and a template builder for the site.
- Wrote structured, constraint-led prompts — ranked priorities, explicit negatives, and an IF/ELSE branch for the voiceover — to get repeatable output from generative models instead of retrying at random.
Keep the second one. Plenty of people can say they used an AI tool. Far fewer can describe why their prompt was built the way it was.
Reuse the two prompts
The still prompt is a reusable headshot generator: change the clothing and background clauses and you have a speaking profile photo for a conference bio or a course page. The animation prompt works on any still where you want a locked frame and a spoken line.
The One Thing To Take Away
Almost every line in both prompts is a refusal, not a request. Do not beautify. Do not zoom. Do not add headroom. Do not invent dialogue. Generative models have strong defaults — a prettier face, a slow push-in, an improvised sentence — and naming those defaults is what makes the output usable.
Ten seconds of you talking does the one thing a résumé cannot: it tells a recruiter what you are like before they read a word. That is the whole reason this project is worth an hour.
Frequently Asked Questions
How long does this take?
About an hour on the first attempt: five minutes choosing the photo, ten on the still, fifteen on the video, twenty on the site and five to check it. The slowest part is writing your own résumé copy, which is why it is worth having ready before you start.
Do I need to know how to code?
No. Both prompts are copy-and-paste, and the portfolio is a template with form fields. Nothing here involves a code editor or a terminal.
Why generate a photo instead of using a real one?
Because the video model needs a specific setup: a wide 16:9 frame, an even background, a still pose and visible hands. Most people do not have a photo like that. Generating one from a selfie is faster than staging the shot.
Will it actually look like me?
That depends almost entirely on the reference photo. A front-facing, evenly lit, unobstructed shot holds the likeness well. A group-photo crop or a three-quarter turn does not, and no amount of prompt wording fixes it.
Why does the hero video have no sound at first?
Browsers block autoplay with audio, so the clip starts muted with a sound button over it. Assume most visitors never press it and put your message in the tagline as well.
How long can the hero video be?
The Aboveyellow hero accepts up to 20 seconds. A 10 to 12 second take is better anyway — it is one sentence, and it loops without becoming annoying.
Should I tell people the video is AI-generated?
Yes. It is your face and your words, but it is a generated likeness, and being upfront costs you nothing. A single line in the About section handles it and reads as fluency with the tools rather than a disclosure.
Build 100 AI Projects With Me
This is one of the 100 AI projects I am building to help you learn AI by making real things, not just reading about them. Follow along for the next one.
Follow on Instagram →